Excel automation for a printing company: processing orders
December 20, 2017
15 min read
no comments
Case Study
ID Line company provides a wide array of full color personalized promotional products like name badges, magnets, signs, etc. for retail, travel, education, healthcare, sports and other industries.
No need to say, that order management is one of the strategic processes, especially for a company that receives hundreds of high volume orders per day. No order should be lost. Each order should be delivered on time. With customized printed products, a manufacturing error could also be very costly. Well, there is no room for mistakes.
ID Line utilizes the latest technology for both customer service and manufacturing. Customers place their orders into an online ordering system (Badgerelease.com). Orders, confirmed by accounting, are then processed and specifications are directed into manufacturing system.
To transfer data from one system to another, many companies rely on Excel. Excel spreadsheets have the power and flexibility to do the job. For ID Line, Excel is a common denominator of online ordering, accounting and manufacturing systems:

However, data transfer is always a potentially weak spot. It requires a great deal of data manipulation, consumes time and resources and has risks of human errors. To improve productivity of this workflow and reduce error-prone manual operations, Paul Albus, Computer Systems Manager, was already using XLTools add-ins.
"We use Excel on a daily basis. The greatest challenge is preparing production files from Excel files sent by customers. XLTools gives us data manipulation tools that are missing from Excel. These tools make it easier for us to create usable production files."
The next step was deeper integration of XLTools into Paul’s data manipulation processes – and we helped set up custom automation without VBA:

"In the example below, we went from a 3-hour manual process to an automated process that takes less than 10 minutes. The example below is done by one person. We have an additional 5 people using XLTools regularly."
Let’s go through the process step by step and review automation of some tricky tasks.
Prepare order confirmations: extract data from CSV to Excel and keep leading zeros
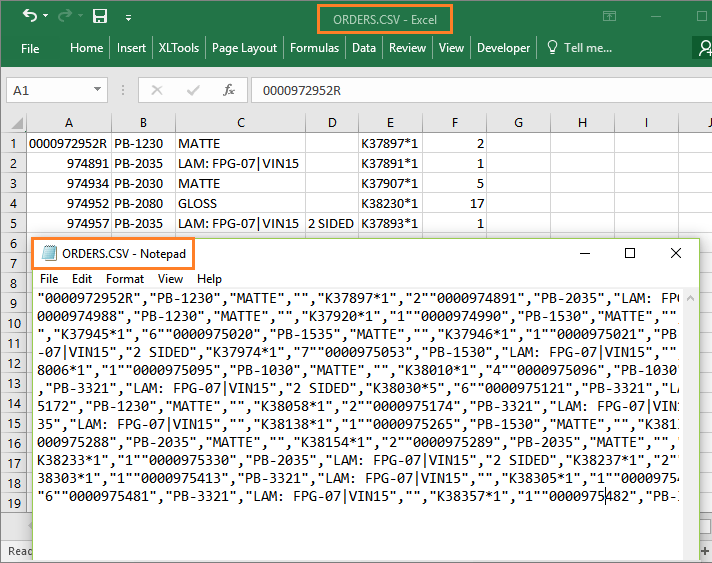
Information about confirmed orders comes from an accounting system in CSV format. The problem is, simply opening the ORDERS.CSV file in Excel is just not enough. Here we face a typical problem: order confirmation numbers (column A) lose the necessary leading zeros. So, the table will require additional formatting.
| XLTools.ExtractTable | |
|---|---|
| WorkbookFile: | ORDERS.CSV |
| Range: | ORDERS!A:D |
| ApplyTableName: | ORDERS |
| Headers: | Confirmation#,Die,Finish,Sides |
| PreserveFormat: | TRUE |
| OutputTo: | NewHiddenSheet[ORDERS] |
- Extract data from “ORDERS.CSV”. Note, that this file should be located in the same folder as your automation file.
- Extract the range A:D from the “ORDERS” sheet
- Name the resulting table “ORDERS”
- Add table headers “Confirmation#”, “Die”, “Finish” and “Sides”
- Preserve cells format
- Place the table on a new hidden sheet named “ORDERS”.
Note that here and later on, we’ll place the tables produced in intermediate operations on hidden sheets.
This way automation is clean and does not generate piles of intermediate files.
Here’s the Excel table you get after extraction:
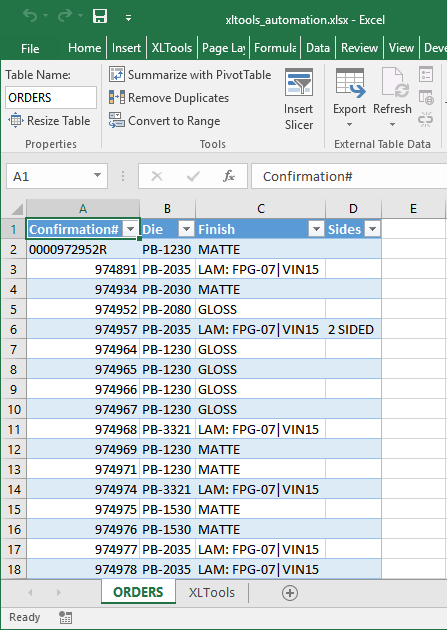
Now it’s time to format the table. We decided to use SQL queries. This manifold instrument will quickly produce the necessary result. With XLTools, you can query Excel tables without leaving Excel interface.
| XLTools.SQLSelect | |
|---|---|
| SQLQuery: | SELECT CASE WHEN LENGTH (tbl1.[Confirmation#]) > 9 THEN tbl1.[Confirmation#] ELSE SUBSTR ('0000000000' |
| PreserveFormat: | TRUE |
| ApplyTableName: | ORDERS |
| OutputTo: | NewHiddenSheet[ORDERS] |
Return leading zeros to values in “Confirmation#” column:
in CASE WHEN a string is less than 9 characters, we will add ten leading zeros. Then extract a substring (SUBSTR) of 10 characters from the right.
When done manually, you would normally apply the CONCATINATE function. However, you’d need to add an additional column, then replace the formula with values, etc. SQL query does the job much faster.
Take column “Die” as is
Remove redundant information from “Finish” column:
REPLACE the unnecessary string ': FPG-07|VIN15' with nothing
Take column “Sides” as is
Preserve cells format
Apply the name “ORDERS” to the output table
Place the result on a new hidden sheet “ORDERS”. Note, that this sheet will replace the sheet generated earlier with ExtractTable command.
After you execute this query, Confirmation numbers have leading zeros and entries in the “Finish” column are standardized:
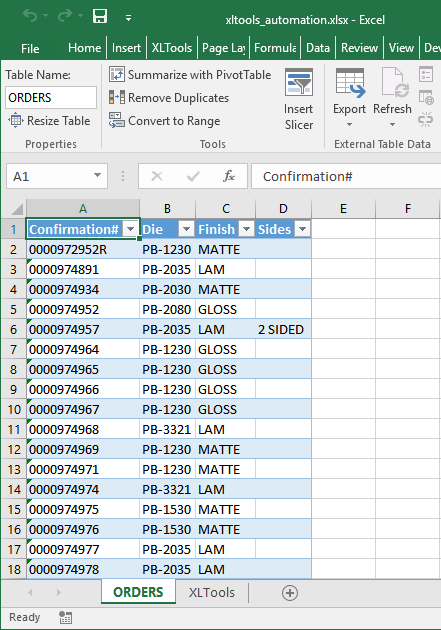
Now the table is ready for further operations.
Prepare order specifications: automatically combine multiple sheets into one
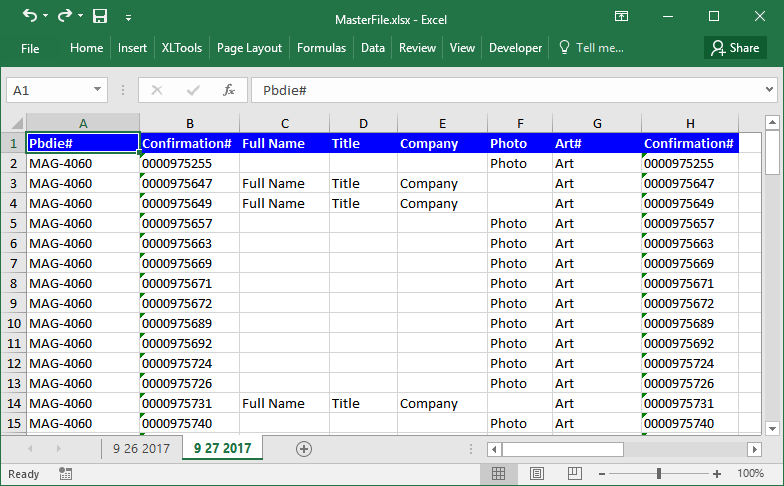
Order specifications come from the ordering system in a MasterFile.xlsx. This master file consists of multiple sheets; one sheet for all orders placed in one day.
| XLTools.CombineSheetsData | |
|---|---|
| Workbook: | MasterFile.xlsx |
| CombineType: | AllIntoOne |
| ApplyTableName: | MASTERDATA |
| MyTablesHaveHeaders: | TRUE |
| PreserveFormat: | TRUE |
| OutputTo: | NewHiddenSheet[MASTERDATA] |
- Take the MasterFile.xlsx
- Combine all worksheets into one master worksheet (AllIntoOne)
- Name the combined table
- Indicate that the tables have headers
- Preserve cells format
- Place the resulting table on a new hidden sheet named “MASTERDATA”
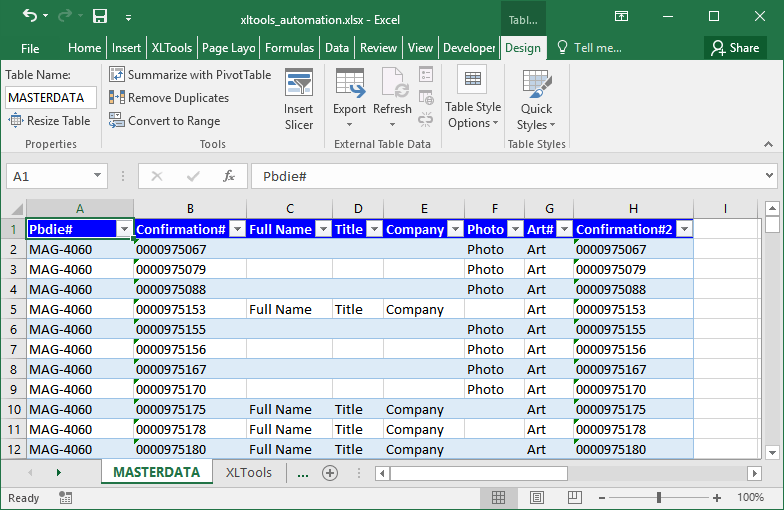
When you run this command, tables from all worksheets are merged on a single worksheet under one header:
Merge tables with SQL query instead of VLOOKUP
Now that both tables (ORDERS and MASTERDATA) are properly formatted, we need to merge them by their common field – the “Confirmation#”.
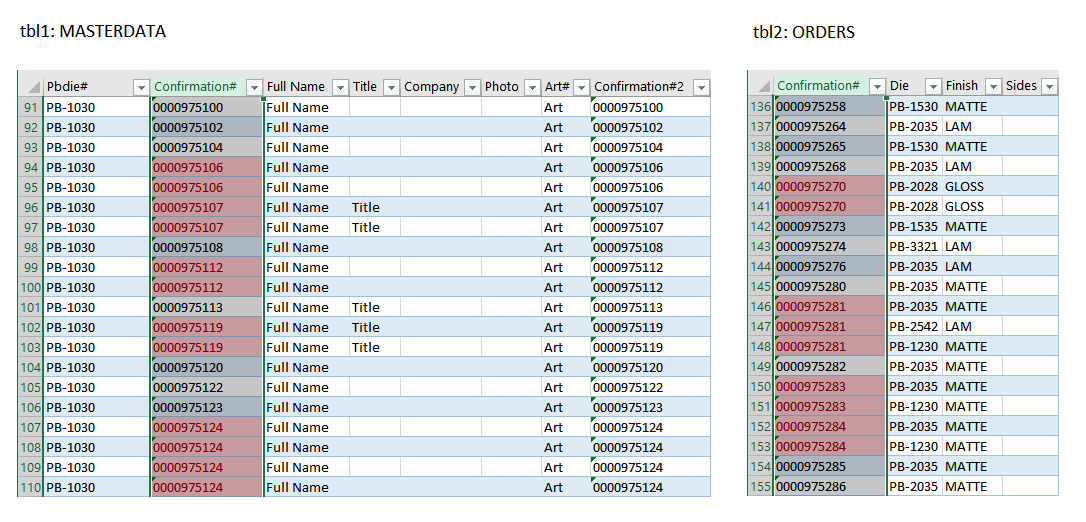
If you need to append MASTERDATA table with columns from the ORDERS table, you could potentially use a VLOOKUP function. But here’s the problem: multiple rows refer to the same confirmation number. VLOOKUP would be incorrect is this case, since it takes into account only the first record.
| XLTools.SQLSelect | |
|---|---|
| SQLQuery: | SELECT ifnull(tbl2.[Die],”) |
| PreserveFormat: | TRUE |
| ApplyTableName: | OUTPUT |
| OutputTo: | NewHiddenSheet[OUTPUT] |
Specify which fields to SELECT:
First thing do to, as Paul required, was to combine values by rows in columns “Die”, “Sides” and “Finish”. Then take this new column and name it as “Die”.
This query would perform the same operation as our Combine Data add-in. The values in these three columns will be combined into a single string with a dash “-“ separator. At the same time, if some cells will appear to be empty (ifnull), they will be skipped.Take a few columns as they are: “Full Name”, “Title”, “Company”, “Photo”, and “Art#”
Take column “Confirmation#2” and rename it as “Confirmation#”
Take data FROM the “MASTERDATA” table and LEFT JOIN with the table “ORDERS” ON their common field “Confirmation#”
Include a condition WHERE “Confirmation#” in table 2 is NOT NULL
ORDER the resulting table BY values in columns “Die” and “Confirmation#2”. This way we apply complex sorting – first, all orders will be sorted by their Die type, and then by confirmation number.
Specify how to output the result of the query:
- Preserve cells format
- Name the resulting table “OUTPUT”
- Place the result on a new hidden sheet named “OUTPUT”
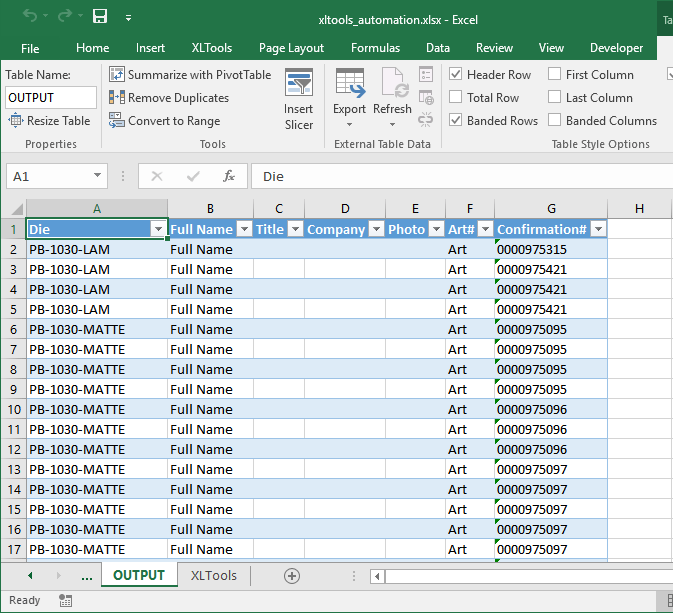
When you execute the command, you will get the following merged table:
Automatically split a table onto multiple sheets by column values
Before Paul can direct the merged order data to manufacturing, this large table should be split into manageable lists. It is necessary to split data by the type of Die (values in column A).
| XLTools.SplitTable | |
|---|---|
| Range: | @OUTPUT |
| MyTablesHaveHeaders: | TRUE |
| SplitKeyColumn: | Die |
| OutputKeyColumn: | FALSE |
| SheetName_Variable: | KeyValue |
| SheetName_Postfix: | ="_"&TEXT(TODAY(), "mmDDYY") |
| OutputTo: | NewWorkbook[WORK.xlsx] |
Select the range “OUTPUT”
Confirm that the table has headers. This way the header will appear on each table after splitting
Split the table by values in the key column “Die”
Do not output this key column in the resulting table
Specify that the resulting worksheets should be named after the KeyValue, meaning values in the key column
Append the name of each worksheet with today’s date as a suffix. To get tabs named as “KeyValue_Today”, we insert this formula:
="\_"&TEXT(TODAY(), "mmDDYY")
This is another advantage of XLTools Automation. Since the cells of automation commands are editable, you can apply Excel formulas when necessary.
Place the result into a new workbook named “WORK.xlsx”. It will be automatically created in the same folder as your XLTools automation file.
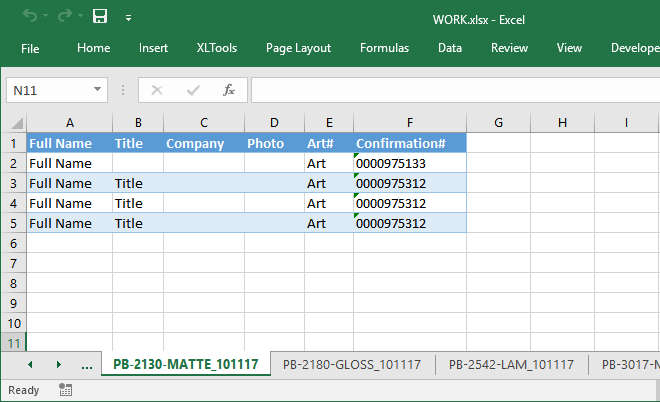
It will take a second to run the command and split the large “OUTPUT” table into some 20-30 worksheets:
Save multiple sheets in a workbook as separate files
One final step left: we need to save all these worksheets as separate CSV files. Then Paul will upload them into the manufacturing system.
| XLTools.SaveSheetsAsFiles | |
|---|---|
| Workbook: | WORK.xlsx |
| FileFormat: | xlCSV |
| OutputFolder: | Work Files |
| OpenOutputFolder: | TRUE |
- Take the workbook “WORK.xlsx”
- Save each worksheet as a separate file in CSV format. Note, that you can set a different format, e.g.:
- xlCSV – CSV (comma-delimited) format. This is what we need in this project.
- xlWorkbookDefault – XLSX format. This is the default format, if you do not specify the FileFormat
- xlWorkbookNormal – XLS format.
- xlTextWindows – TXT format (tab-delimited).
- xlHtml – HTML format.
- xlXMLSpreadsheet – XML format.
- Save these files in a folder “Work Files”. The folder is automatically created at the same destination as your automation file. Each file is named by the name of its source worksheet.
- Request to open the folder upon completion of the command.
If you have many worksheets, it may take a few minutes to complete the process:
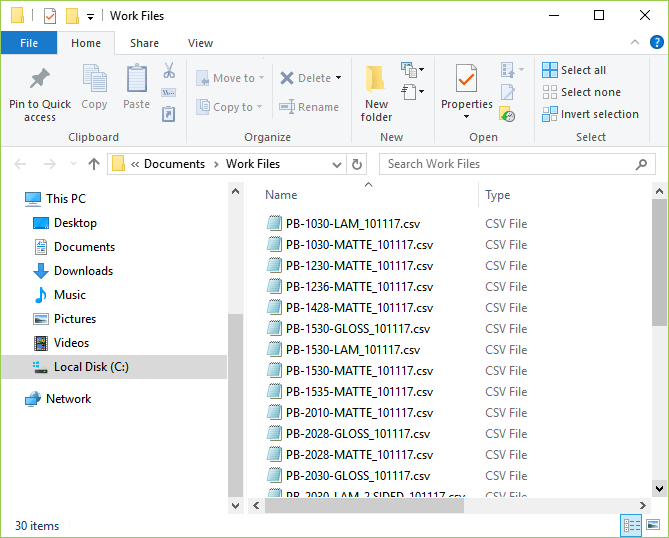
Done! Now the files are ready for upload into manufacturing system. Each file contains specifications of confirmed orders for a specific type of printing die.
Add a custom button to run the entire process in a single click
We have gone through each command separately, step by step. Now, you could execute the entire sequence of commands with a single click of a button on XLTools ribbon.
For example, in Paul’s project the button “Generate Work Files” starts the whole process:

The process runs with no stops from the beginning to the end: preparing order confirmations and specifications, merging tables, splitting orders by the type of printing job required, and eventually saving as separate CSV files.
- All data manipulations now take literally a minute or less.
- With no manual operations, the risk of human error is minimal.
- Most importantly: transferring data from the ordering system to the manufacturing system runs smoothly and accurately.
By improving productivity of this workflow, ID Line improved efficiency of its entire order management process. We are honoured that XLTools helps ID Line ensure order delivery time unparalleled in the promotional products industry.
Do you have an Excel process that needs automating?
"We are thrilled with the results! We would definitely recommend XLTools. The company is very responsive and the product is fantastic."

March 30, 2016
3 min read

July 17, 2023
3 min read
Subscribe to occasional emails with special offers, updates and other XLTools news.
Thank you, Abishek! Excellent suggestion, we'll consider adding this functionality to our Excel Automation add-in.