Insert time in cells from a straightforward time picker with easy time formatting.
Same as entering dates in Excel cells, entering time can be quite frustrating. Should you use AM/PM or a 24-hour format? Do you need just hours and minutes, or seconds as well? Will Excel display time values exactly as you want? With this Excel time picker, you can easily manage appointments and timesheets or add a timestamp on a report.
The Popup Clock add-in is a simple and straightforward time picker:
- Pops up next to a cell
- Easy to use: select cells – set time, or date and time
- Populate cells, columns, rows or any ranges with time values
- Choose from numerous default time format options, preset and custom
- Works both in 64 bit and 32 bit Excel
Before you begin, add Popup Clock to Excel
Popup Clock is one of the 20+ features within XLTools Add-in for Excel. Works in Excel 2024, 2019, 2016, 2013, 2010, and Microsoft 365.


How to insert or change time in a cell using the Popup Clock
- Select a cell.
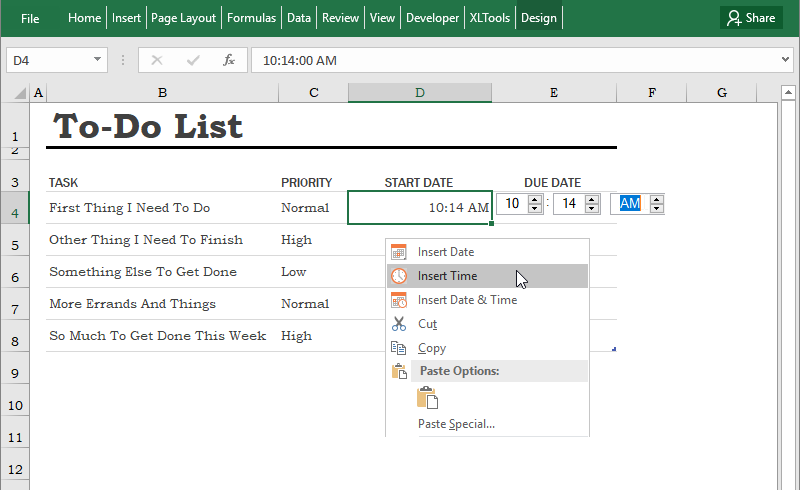
- In the Date/Time group, click the Insert Time button The time picker will pop up next to the cell.Or:Right-click and choose Insert time.Or:Use a shortcut – press Ctrl + Shift + ; (semi-colon).
- Set the time by using a scroll wheel or the Up/Down arrows Press Enter Done.Note:Is it the time format you wanted? Learn how to change the default time format of the Popup Clock.
- To change a time entry, click on the Clock icon to the right of the cell Change time.

The Popup Clock remembers the last used time value, so it is easier to insert time the next time.
Note:After you enter time, the cell is automatically assigned Number/Time format. If you delete the time value later, the cell will still keep its Time format, and the Popup Clock icon will remain available for this blank cell. To remove the icon, change the cell's format to General.
How to populate an entire column, row or non-adjacent cells range with time
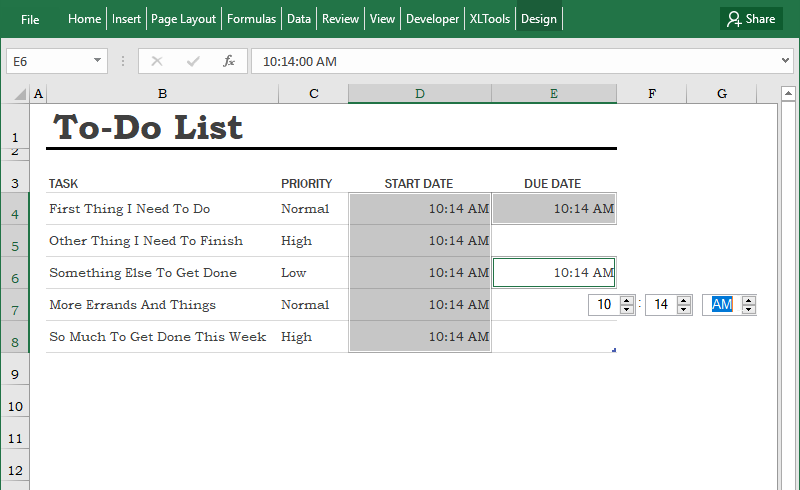
Use the Popup Clock to populate with time values an entire range. You can insert time into table columns, rows, merged cells, non-adjacent cells or any custom range (limitation up to 4000 cells) just the same, as into a single cell:
- Select a range.
- In the Date/Time group, click the Insert Time button The time picker will pop up next to the cell.Or:Right-click and choose Insert time.Or:Use a shortcut – press Ctrl + Shift + ; (semi-colon).
- Set the time by using a scroll wheel or the Up/Down arrows Press Enter Done. The whole range is populated with the selected time value.Tip:Learn how to populate cells with consecutive time entries.
- To change the time entry in a specific cell, click on the Clock icon to the right of the cell Change time.
Note:After you enter time, the cells are automatically assigned Number/Time format. If you delete some of the time values later, the cells will still keep their Time format, and the Popup Clock icon will remain available for these blank cells. To remove the icon, change the cells' format to General.
How to populate a range with consecutive time values
With the Popup Clock you can quickly populate a range with consecutive time entries (sequential hours):
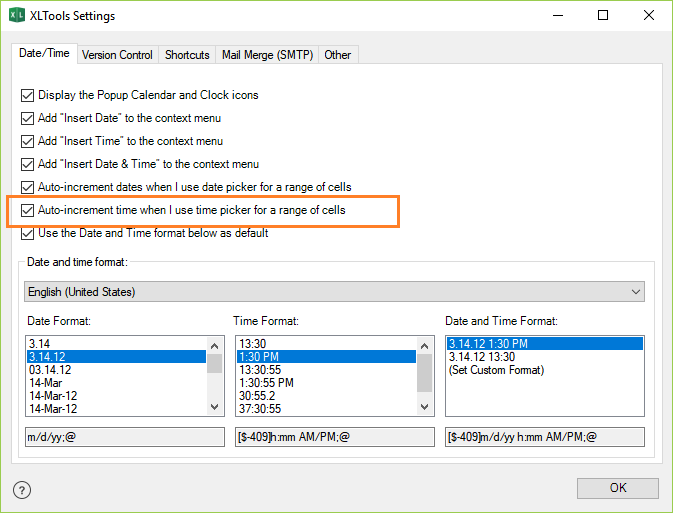
- XLTools tab Settings button Date/Time tab Check the box Auto-increment time when I use time picker for a range of cells OK.
- Select a range.
- In the Date/Time group, click the Insert Time button The time picker will pop up next to the cell.Or:Right-click and choose Insert time.Or:Use a shortcut – press Ctrl + Shift + ; (semi-colon).
- Pick the starting time value Done, the whole range is automatically filled with consecutive time values with 1 hour increments.
How to insert both date and time into a cell
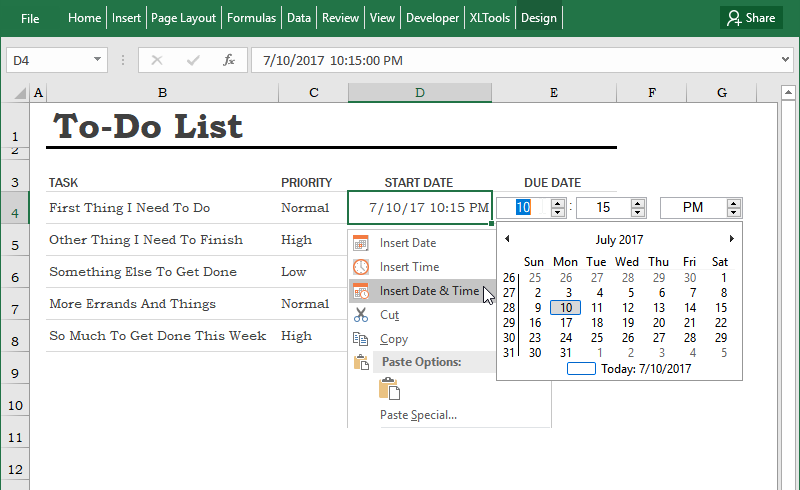
- Select a cell.
- In the Date/Time group, click the Date & Time button The Popup Calendar with Clock will appear next to the cell.Or:Right-click and choose Insert Date & Time.Or:Use a shortcut – press Ctrl + ; (semi-colon), then release the keys and press Ctrl + Shift + ; (semi-colon).
- Set the time by using a scroll wheel or the Up/Down arrows Choose a date from the Popup Calendar Done.Note:Is it the time format you wanted? You can change the default format of the Popup Calendar and Clock.
- To change an entry, click on the icon to the right of the cell Change time and date.
Note:After you enter date and time, the cell is automatically assigned Number/Date format. If you delete the value later, the cell will still keep its Date format, and the Popup Calendar with Clock icon will remain available for this blank cell. To remove the icon, change the cell's format to General.
How to insert only date (without time) into a cell
Use the Popup Calendar date picker to pick and insert dates into cells and ranges:
- Select a cell or a range.
- In the Date/Time group, click the Insert Date button The Popup Calendar will appear next to the cell.Or:Right-click and Insert Date.Or:Use a shortcut – press Ctrl + ; (semi-colon).
- Pick a date from the Calendar Done.

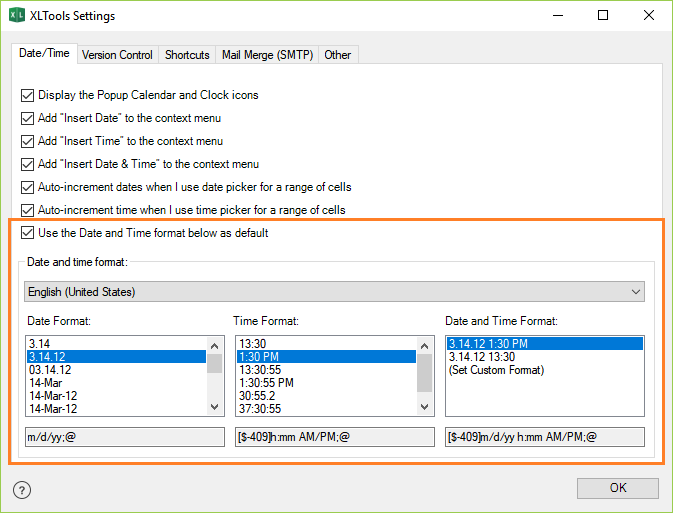
How to change the default time format of the Popup Clock
You can change the default time format of the Popup Clock:
- Click Settings on XLTools ribbon Date/Time tab.
- Check the box Use the Date and Time format below as default.Note:If you uncheck this box, the Popup Clock will use the format specified in your system settings.
- Select your preferred format, e.g. the format customary in your country or language.Or:Define and set your custom format.
- Click OK Done.
You may find that some cells would not comply with the Clock's format settings. It means the cells had been assigned a different time format earlier. In this case, change the cells' format:
- Select cells Right-click and choose Format cells.
- Open Number tab Time format Select the required time format.
Initially, the Popup Clock employs your system settings for default date and time format. You can change your system settings altogether. Note, this will affect all user accounts on your computer:
- Control Panel Clock, Language, and Region Region.
- Formats tab Set date and time formats, first day of the week.
- Location tab Set your home country location.
- Administrative tab Change system locale Restart your computer.
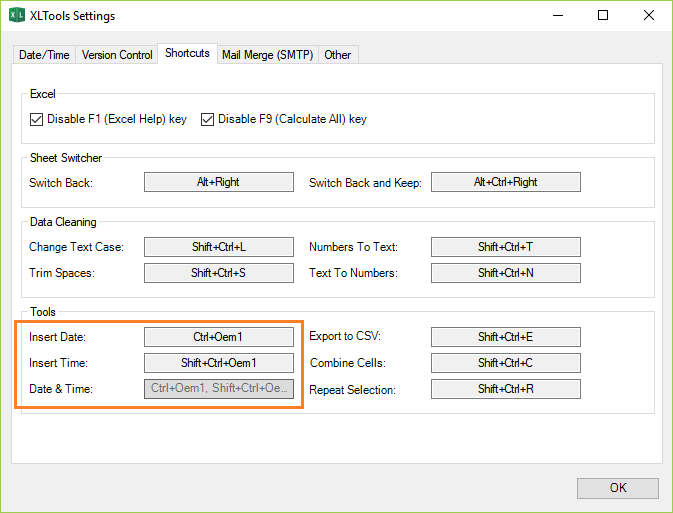
How to change a shortcut for the Popup Clock
For your convenience, the default shortcut for the Popup Clock is Ctrl+Shift+; (semi-colon) – the same combination used in Excel to insert the current time. You can change the Popup Clock shortcut at any time:
XLTools tab Settings button Shortcuts tab Set a different shortcut OK.
How to add/remove the Popup Clock icon
The Clock icon appears to the right of a selected a cell, when the cell has Time format. Clicking the icon opens the time picker.
- To disable the Clock icon:
- Click Settings on XLTools ribbon Date/Time tab.
- Uncheck the box Display the Popup Calendar and Clock icons OK.
- Done! The icons will not display, but the Calendar and Clock will still be available for use. You can bring the icons back at any time.
- To make the Clock icon readily available near a blank cell, column, row or custom range:
- Select a blank cell or a range.
- Home tab Number group Time OK. This will assign time format to the cells.Or:Use the Popup Clock to insert any time value Press Delete. This will remove the actual values and yet assign time format to the selected cells.
- Done! Now if you select any cell in this range, the Clock icon will appear near that cell.
- To remove the Clock icon from empty cells:If a cell is empty, but it still has an icon beside it, it means that the cell still has date or time format assigned. To remove the icon from blank cells, change their format back to General:
- Select an empty cell or a range.
- Home tab Edit group Clear formats.Or:Home tab Number group Select General from the drop-down list.Or:Right-click Format cells Number tab Select General OK.
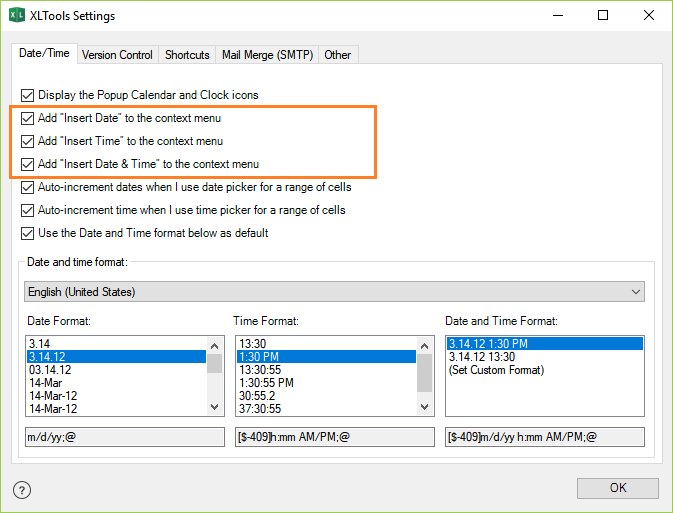
- Click Settings on XLTools ribbon Date/Time tab.
- Check/uncheck the relevant boxes:
- Add "Insert Date" to the context menu
- Add "Insert Time" to the context menu
- Add "Insert Date & Time" to the context menu
- Click OK Done.
How to embed a time picker into an Excel spreadsheet
Try the Embedded Calendar feature. You can embed calendar and clock into a workbook, and it will be available to other users of the workbook.


The Popup Calendar itself is only visible to users who have XLTools installed. However, we also have an Embedded Calendar feature that lets you embed a date picker directly into a workbook and share it with others — they do not need XLTools installed. Please note that it may not work reliably in every environment due to differences in Windows/Excel versions and security settings, so we recommend giving it a try to see if it works for you.
Thank you for the question! Currently there is no option to change the settings for the Popup Clock. We'll take it into consideration for the future releases. But you can always use the hotkeys to insert the current time: select a cell and click the combination Ctrl+Shift+; (or, you can set another combination in XLTools Settings > Shortcuts tab).
Absolutely. The Calendar is a tool that helps you insert date/time into cells. So the formula to calculate the difference between two times works as usual. Say, use the Popup Calendar to enter time: A1=10:00 AM, B1=4:30 PM. Then use the formula C1=B1-A1, and the result will be 6:30 (6h 30min difference). Note, that column C should have custom format h:mm.
Can this Add-in be used with 2016 Excel Userform in VBA?
Thanks
Hello Frank,
No, the Popup Calendar cannot be used with Excel VBA Userforms. However, we do have an Embedded Calendar feature that lets you embed a date picker into a workbook and share it with other users without them needing XLTools installed. Please note that it may not work reliably in every environment due to differences in Windows/Excel versions and security settings, so we recommend giving it a try to see if it works for your setup.