ExportToCSV command: automatically convert Excel data to CSV
ExportToCSV command – one of XLTools automation commands – converts ranges from Excel to plain text CSV format.
XLTools Automation tool allows you to automate repetitive routine processes in Excel by setting up commands in a table, without having to create VBA macros.

For non-recurring tasks, use the standard Export to CSV tool on XLTools ribbon.
Before you begin, add the Automation tool to Excel
Automation is one of the 20+ features within XLTools Add-in for Excel. Works in Excel 2019, 2016, 2013, 2010, desktop Office 365.


Parameters and available options
Insert the command
- Select a starting cell where to place the command, e.g. A1.
- Open XLTools tab In the Automation group, open the drop-down list Select ExportToCSV.
- The automation table will be inserted on the worksheet.
- Fill out the automation table. All parameters and available attributes are listed below.
Tip:select the cell and see a helpful tooltip. Some attributes also have a drop-down list of available options to choose from.
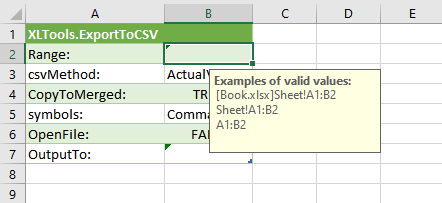
Range:
Specifies which data range should be processed.
- Required parameter, cannot be blank
| Options | Meaning |
|---|---|
| A1:B2 | Range A1:B2 on the current worksheet |
| Sheet1!A1:B2 | Range A1:B2 on Sheet1 in the active workbook |
| Sheet1!A:C | Columns A:C on Sheet1 in the active workbook |
| Sheet1!1:3 | Rows 1:3 on Sheet1 in the active workbook |
| Sheet1! | Entire Sheet1 in the active workbook |
| Sheet1!Table1 | Table1 on Sheet1 in the active workbook, without table headers |
| Sheet1!Table1[Column1] | Column1 in Table1 on Sheet1 in the active workbook, without table headers |
| Sheet1!Table1[[Column1]:[Column3]] | Columns 1:3 in Table1 on Sheet1 in the active workbook, without table headers |
| Sheet1!Table1[#All] | Table1 on Sheet1 in the active workbook, including table headers |
| Sheet1!Table1[[#All],[Column1]] | Column1 in Table1 on Sheet1 in the active workbook, including table headers |
| Sheet1!Table1[[#All],[Column1]:[Column3]] | Columns 1:3 in Table1 on Sheet1 in the active workbook, including table headers |
| [Book1.xlsx]Sheet1!A1:B2 | Range A1:B2 on Sheet1 in the workbook Book1. Book1.xlsx must be located in the same destination as the automation file. |
| 'C:\Documents\[Book1.xlsx]Sheet1'!A1:B2 | Range A1:B2 on Sheet1 in the workbook Book1. Book1.xlsx must be located in the specified file path location. If this workbook is closed, it will be automatically opened to execute the operation. |
Tip:use the standard rules of structured references in Excel. For example, if names of worksheets or workbooks contain spaces, enclose the name in single quotes: 'Orders April'!A1:H10, or '[All Orders.xlsx]Orders April'!A1:H10.
csvMethod:
Defines which format the values should be exported into the resulting CSV file.
- Required parameter, cannot be blank
| Options | Meaning |
|---|---|
| ActualValues | Export values in default format – as displayed in Excel formula bar. For example, 0.1, 3/12/2016, 40.00 |
| FormattedValues | Export values in the format that matches Excel formatting – as displayed in cells. For example, 10%, 12-Mar-2016, $40 |
CopyToMerged:
If your source Excel range contains merged cells, you can duplicate values from merged cells into the corresponding places of the resulting CSV text string.
- Optional parameter, you can remove it from the command
| Options | Meaning |
|---|---|
| TRUE | Values in merged cells in Excel will be duplicated in the resulting CSV file. Recommended if your Excel range has merged cells. |
| FALSE | Values in merged cells in Excel will not be duplicated in the resulting CSV file. Use if Excel range has no merged cells, otherwise CSV string will have blank values. |
| (none) | Same as FALSE |
symbols:
Defines a separator (delimiter) between values in the resulting CSV file.
- Required parameter, cannot be blank
| Options | Meaning |
|---|---|
| Comma | Use comma (,) as a separator. This is the most common option for CSV files. |
| Semicolon | Use semicolon (;) as a separator |
| Tab | Use tab (tabulation symbol) as a separator |
| Pipe | Use pipe (|) as a separator. Also called a vertical bar or a vertical line. |
OpenFile:
Defines whether to open the resulting CSV file after the command is executed.
- Optional parameter, you can remove it from the command
| Options | Meaning |
|---|---|
| TRUE | Open the resulting CSV file after the command is executed. You can immediately review the results. |
| FALSE | Don’t open the resulting CSV file after the command is executed |
| (none) | Same as FALSE |

Note:the resulting CSV file will open either in Notepad, or in Excel. This depends which program you have as default to open *.csv files on your computer.
OutputTo:
Specifies how to name the resulting CSV file and where to save it on your computer.
- Required parameter, cannot be blank
- The length of the text string cannot exceed 250 characters
| Options | Meaning |
|---|---|
| Result.csv | Name the resulting file Result.csv. The file will be saved to the same destination as the automation file. If the workbook with automation commands is not yet saved, the default location for output is the “My Documents” folder of the current user. |
| C:\Documents\Result.csv | Name the resulting file Result.csv and save it to the specified destination on the computer |
Note:each time you execute the command, the new output file "Result.csv" will replace the previous file with the same name. So, before running the command next time, you can change its name or destination folder in this OutputTo parameter.
Step-by-step example [download]
This step-by-step example will take you through the setup of the ExportToCSV automation command.
In this example, you have an Excel table with product orders. Every week the file gets updated. And each time you need to convert data to a CSV file. When you automate this process with the ExportToCSV command, you can run it in a button click.
Download this sample file Save it to your computer Extract from the archive Follow the steps below to execute the command yourself.

1. Insert the ExportToCSV command
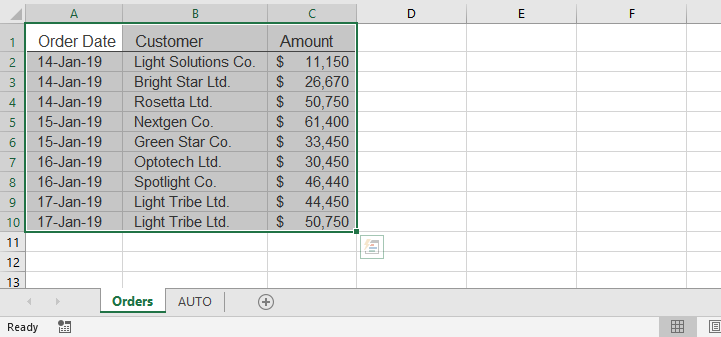
- Open the Excel file with the source data you want to export to CSV. In our example, the spreadsheet Orders.xlsx contains the worksheet "Orders" with a table of recent product orders.
- On the sheet AUTO, select a starting cell where to place the command, e.g. A1.
- Open XLTools tab In the Automation group, open the drop-down list Select ExportToCSV.
- Done! The table with the automation command is added on the worksheet.

Add a new worksheet Name it, for example, “AUTO”. This worksheet will hold automation commands.
Tip:it’s best to keep automation commands on a different worksheet separate from the data.
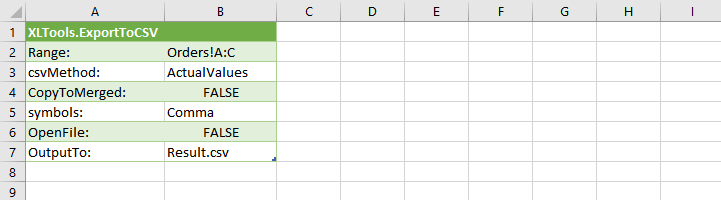
2. Specify parameters of the ExportToCSV command
Once the ExportToCSV command is inserted, specify the parameters. They define how to export the source data to CSV.
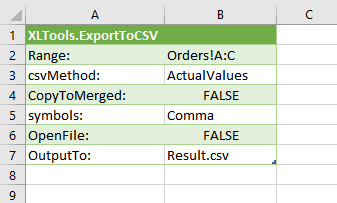
What each line in this command reads:
- Range: take the range A:С on the sheet Orders. This is the source range to export to CSV.
- csvMethod: choose ActualValues, so that the values in the table are exported to CSV in default format, just as they are displayed in Excel formula bar.
- CopyToMerged: select FALSE, since there are no merged cells in the source range.
- symbols: choose comma as a delimiter between values in the resulting CSV file.
- OpenFile: choose FALSE, not to open the resulting file after the command is executed.
- OutputTo: name the resulting file "Result.csv". It will be saved to the same folder as the file with automation commands.
See other available options to use in parameters.
3. Execute the command and review the resulting CSV file
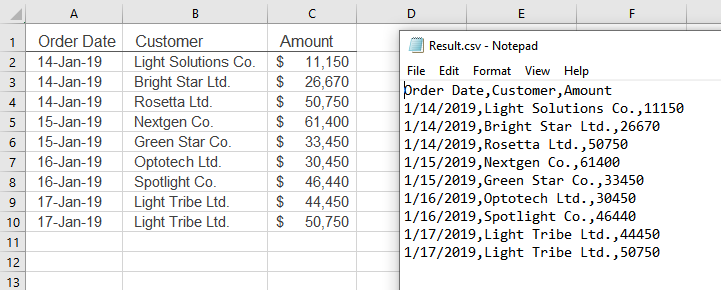
- Select the table with the command In the Automation group, click the Execute Commands button.
- Wait until the processing is complete Done! Find the resulting file "Result.csv" in the same folder as the source Excel workbook with commands.
See that:
- Values are exported in the default format
- Comma is used as a delimiter
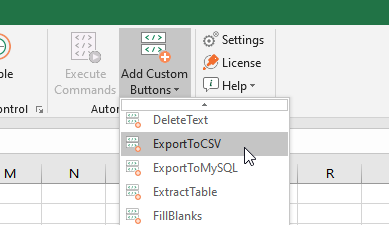
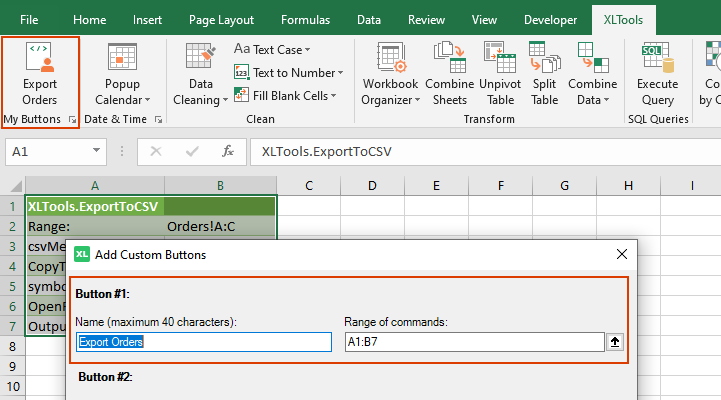
If you have to run the command over and over again, add a custom button on the ribbon. So that next time you execute the command in just a click.
- In the Automation group, click Add Custom Buttons A window will open.
- Name the button, e.g. "Export Orders" Specify the range of the ExportToCSV command Click Save.
- Done! Your custom button will appear on XLTools tab. Now the command will be executed when you click the button.
Any questions or suggestions?

